The Get Started articles assume that you've completed the Trumba® Startup Wizard.
(Questions? Please email Trumba Sales or call 1-800-925-0388.)
After completing the wizard, the Trumba editing environment opens to your new calendar, which shows as active (and selected with a check mark) under Current Publication on the left.
A link to your "hosted" calendar appears on the congratulations screen:
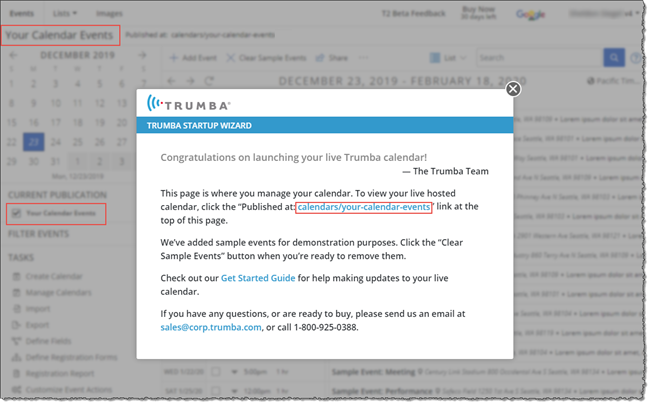
Editing environment after running the Trumba Startup Wizard
In the wizard, you may have noticed the Your privacy policy URL and Your terms of use URL fields. These fields hold links to the terms of use and privacy policies for organizations that are targeting customers in the European Economic Area (EEA), in compliance with the General Data Protection Regulation (GDPR). If you provided the URLs while completing the wizard, they appear in the footer in Event Actions. For more information, see Customize the Event Actions web app.
For organizations that are targeting customers in the EEA:
In Trumba, you organize events using calendars, custom fields, and event templates. In many cases, it's best to manage all of your events using one calendar, one event template, and a few custom fields, which is the model we follow in the Get Started articles.
Tip Depending on your organization, you may need more than one calendar and/or event template. For information, go to: Implementation Guide - Templates, fields, and calendars.
This article, Get Started 1, provides a high-level, hands-on review of the hosted calendar website that is auto-generated when you complete the wizard, and the Trumba editing environment (also known as the Trumba administrative interface):
For the Get Started articles, we ran the wizard using the General calendar type, and then scanned Google.com for the default colors and styles. Your calendar will reflect the choices you make.
It's important to have this context at hand when you begin to make adjustments to your calendar, and then add your own events, which is covered in Get Started 2 through 6.
Tip You can print this article from your browser, or to work on-screen, you can open two browser windows, one with this article and the other with the Trumba editing environment.
When you completed the wizard, your "hosted" calendar website was published to the web using the default views, controls, and settings generated by the wizard. All of these are configurable, but the Get Started series assumes you've started with the wizard defaults.
The default calendar generated by the wizard also includes sample events, with sample locations and images. These are for demonstration purposes only, and may not match what you'd expect to see for real events. For example:
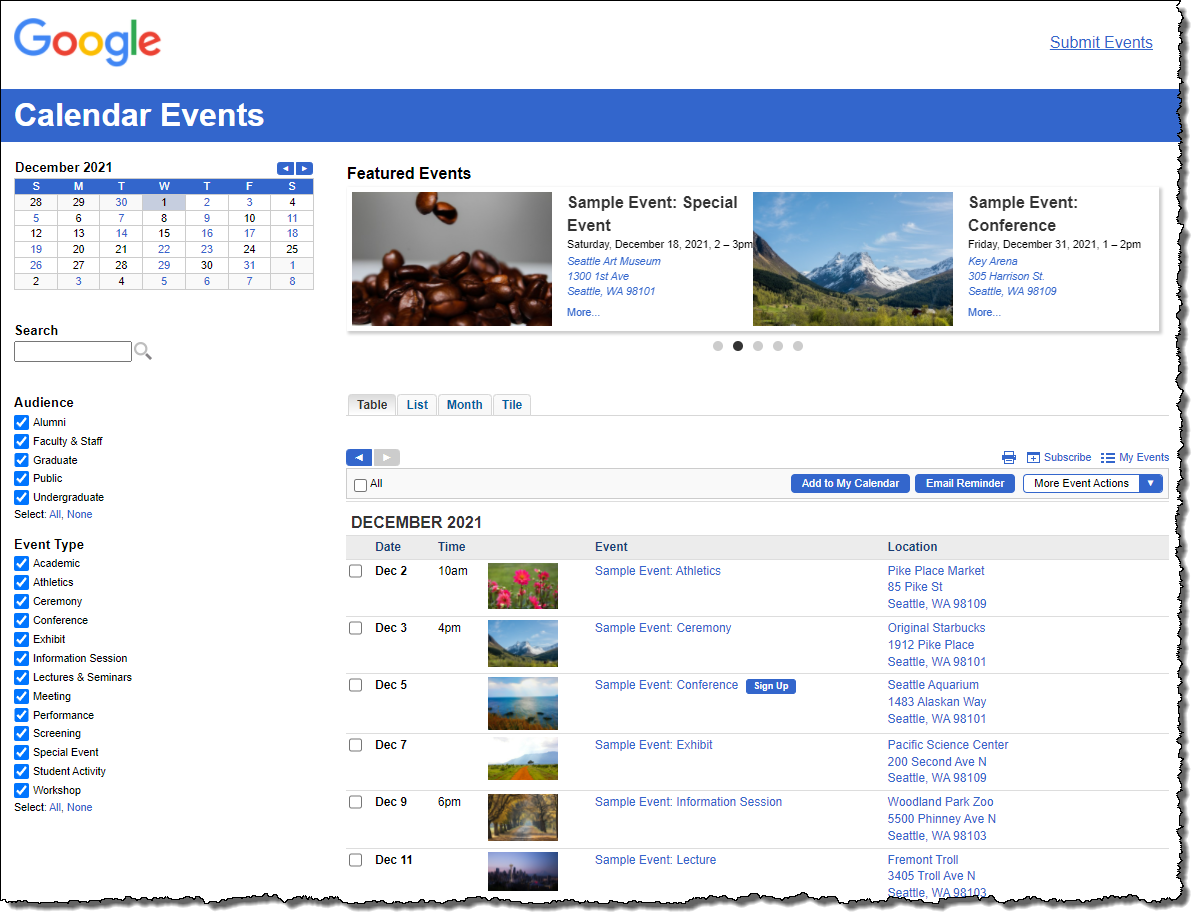
Example of a hosted calendar generated by running the Trumba Startup Wizard
The Trumba hosted calendar website is publicly available on the web and is ready for use as your live calendar. The basic website created by the Startup Wizard can be further customized to match your current website. For assistance in customizing the hosted website please email Trumba Support.
Your calendar can also be embedded directly into your website using our widget technology (also known as Spuds). For more information, go to: Get Started 3: Spuds, publishing, and integrating calendars.
Check out your live, hosted calendar
Before you begin updating your calendar, we recommend reviewing the hosted calendar, generated by running the Trumba Startup Wizard.
For help with setting up and/or modifying the fields, values, global color settings, and spuds in your default hosted calendar, go to Get Started 2 and Get Started 3.
Your hosted calendar displays the current main Calendar view (or "spud"), along with its collection of other spuds, using the styles and settings currently configured in Trumba.
This effect is achieved using the Event Slider promotion spud, the Featured Event field on the event template, and the option set in Publish settings. For more information, go to Get Started 2: Update fields and settings, and create events and Get Started 3: Spuds, publishing, and integrating calendars.
Click the large bullets under the slider to move to a different event (and to halt the auto advance to the next event).
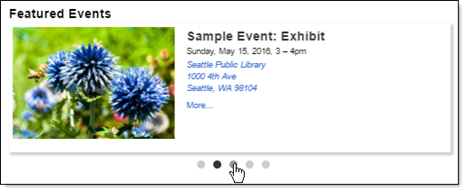
Featured Events using the Event Slider spud
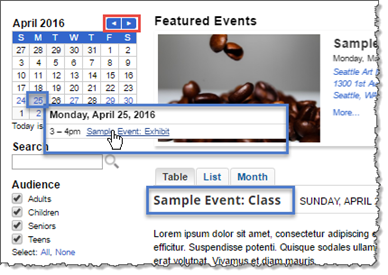
Datefinder spud with navigation elements
Note The color of the days-of-the-week bar and navigation buttons above the Date Finder match the active button color set in the wizard. The color of the active days matches the active link color set in the wizard.
The small calendar appears by applying the Date Finder promotion spud.
Note The wizard set up the Audience and Event Type custom fields and values, plus added sample events flagged with each possible value. If you click Clear Sample Events, the events AND the visible filters on your calendar disappear, since no events exist for the filters to display. (Filters only appear when there is an active target event to display.)
Note There are other calendar views available that you can provide for your site visitors, and you can control which is the default. For more information, go to Get Started 3: Spuds, publishing, and integrating calendars.
Click the title of a sample event in any of the views to open the event detail page. On the event detail page, explore the event information, field values set for that event (and applied by the filters in the hosted view), link and map to the location, and available event actions (see the next step).
Note: The sample events use a basic registration form. You can use this same form or create your own form with custom registration questions. For more information, go to Get Started 6: Event registration.
Click one of the Sign Up buttons to open the Event Registration panel, and then review the information and registration features available for site visitors.
The Trumba editing environment (also known as the Trumba administrative interface) is where you manage your calendar and events. All of the views and controls that you reviewed on your hosted calendar in the "Try It" section above are configured here in the editing environment.
This section assumes you're starting from the default settings generated when you completed the Trumba Startup Wizard. (Questions? Please email Trumba Sales or call 1-800-925-0388.)
Navigate your Trumba editing environment
It's important to review the basic building blocks of the Trumba editing environment and the default settings generated by running the wizard, prior to making updates.
For help and practice with making the updates, as required for your organization, go to Get Started 2 through 6.
The Trumba editing environment opens with your new calendar displayed. Your calendar shows as active (and selected with a check mark) under Current Publication on the left (highlighted in the screenshot at the top of this page).
IMPORTANT The calendar shown and all calendar-specific controls in the Trumba editing environment apply only to the currently active calendar.
Take a look at the other views available to the left of the search box: 1 Day, 3 Day, 7 Day, Week, Month, 5 Week, and Year.
Click the title of a sample event in any of the views to open the Edit <"event title"> page. Explore the tabs and fields available in the default event template generated by the wizard. For more information, go to Get Started 2: Update fields and settings, and create events and Get Started 6: Event registration.
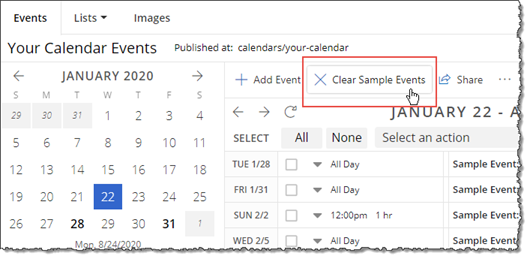
IMPORTANT When you click Clear Sample Events, ALL sample events are deleted (even if you've edited them), and they aren't retrievable. The events AND the visible filters on your calendar disappear, since no events exist for the filters to display. (Filters only appear when there is an active target event to display.)
For more information, go to Get Started 2: Update fields and settings, and create events.
For more information, go to Get Started 6: Event registration.

Note The Clear Sample Events link appears only until you've clicked it once, to remove your sample events.
Click Publish Settings to open the Publishing Control Panel. Explore the main calendar, control, and promotion spuds you saw in action on your hosted calendar.
You configure, generate, and copy the spud code from Trumba, and then paste it into your own organization's overall website code. For more information, go to: Get Started 3: Spuds, publishing, and integrating calendars.
Tip You can also click the Help widgets ( ) for in-context information and tips wherever they appear in the editing environment.