You reviewed your hosted calendar and Trumba® editing environment in Get Started 1, and how to modify the default settings generated by the Trumba Startup Wizard in Get Started 2.
This article covers the default main calendar, filter, and control spuds created by the wizard, how the spuds work in your hosted calendar, a few practice procedures for adding new spuds to your default calendar, and how to integrate the spuds into your website:
Tip You can print this article from your browser, or to work on-screen, you can open two browser windows, one with this article and the other with the Trumba editing environment.
Every calendar and event view you create in Trumba, including for the main calendar, is a spud. Spuds are lines of code that you that you embed within your overall website to provide site visitors with customized views of event information.
Spuds function like windows on your web pages. The event information visitors see in the windows comes directly from the Trumba servers where your event data is stored. Using spuds allows you to update information in one place and automatically distribute it in different ways in multiple locations. It also means that updates you make to your event information show up automatically everywhere a spud is embedded.
The default calendar generated when you ran the Trumba Startup Wizard included a main calendar spud and a collection of control and promotion spuds, pre-assembled to generate your hosted view. On your organization's calendar, you customize and assemble the spuds to display event information as you choose.
We'll start from the default main calendar, control, and filter spuds generated by the Trumba Startup Wizard (as we explored in Get Started 1 and Get Started 2). We'll then review how they're configured in the Trumba editing environment and appear on your hosted calendar.
IMPORTANT If you create a new custom field, add a calendar view, or make other changes presented in these articles, you can keep them on your live calendar after your practice sessions, or choose to remove them. You can always modify them again later!
For more information, go to What are calendar views and spuds.
How does the main calendar spud work on your hosted calendar?
This section provides an overview of the main calendar spud on your hosted calendar.
The Trumba editing environment opens to your new calendar, which shows as active (and selected with a check mark) under Current Publication on the left.
Notice the three default views available when you first set up a new calendar: Classic Table, List, and Classic Month.
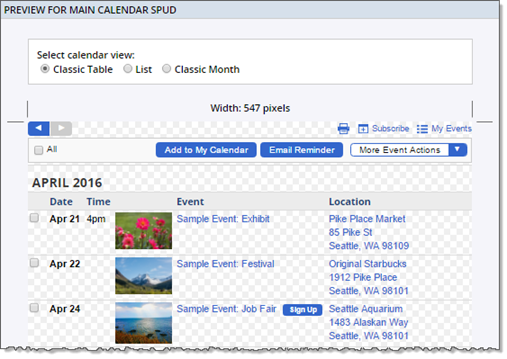
The dates for your events may be different from the dates shown here.
Close the preview window.
Notice the choices you have for controlling the event display.
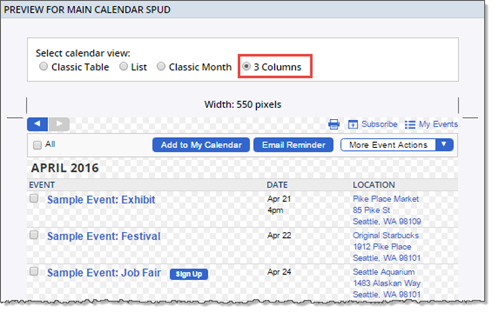
You now have four views available, Classic Table, List, Classic Month, and 3 Columns. The following screenshot shows the 3 Columns view.
Preview window, with the current, available views listed in tabs at the top.
How do control spuds work on your hosted calendar?
Control spuds give site visitors control over which events they see and how the events are presented.
Note Because control spuds control the events on the main calendar, standard practice is to embed them into the same webpage where the main calendar spud is embedded. In this article, we'll review how the control spuds work using your hosted calendar, in which the spuds are embedded automatically.
The following screenshot shows the hosted calendar we've been using for the Get Started articles, with three control spuds highlighted: View Chooser Tabbed, Search, and Filter. (Control spuds control the display and presentation of events.)
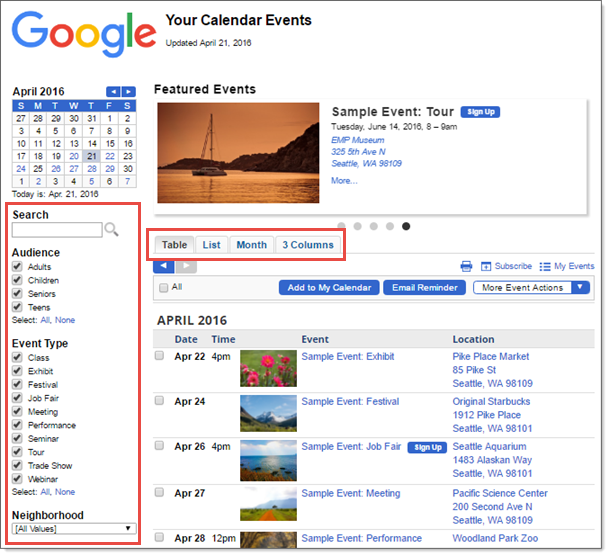
© 2015 Google Inc. All rights reserved. Google and the Google Logo are registered trademarks of Google Inc.
In the screenshot above, you can see that the 3 Columns view, which we added to the main calendar earlier in this article, has been added automatically to the View Chooser Tabbed spud.
The procedure below covers adding the Neighborhood custom field that we created in Get Started 2 to the Filter spud.
Note The Month List spud is available, but not enabled by default for your hosted calendar. To enable it, go to the Publishing Control Panel > Hosted View tab, click Edit Settings & Styles, and then set Select month list spud to Yes.
You can always click Preview on the Hosted View tab to see your enabled spuds in action.
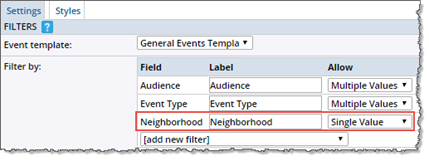
Adding the Neighborhood field to your filter spud.
Neighborhood custom field added to the filter spud.
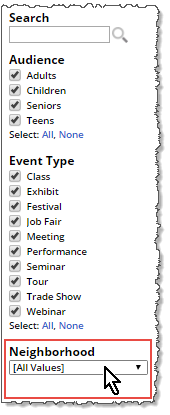
Tip Even if you've created the new Neighborhood custom field, and added that field to the Filter spud, you'll still need to add an event to your calendar with the Neighborhood field set in order to see it added to the filter on your hosted calendar. Fields/values appear on the calendar only if they exist on an event.
How do promotion spuds work on your hosted calendar?
Promotion spuds are primarily used to promote events on pages of your website that don't contain the main calendar spud. (For this article, however, we'll review only how they work on your hosted calendar, which of course does include the main calendar spud.)
For example, suppose your organization provides an event calendar on a separate "Events" page on its website. To increase visibility of certain events, and drive site visitors to the Events page, you might embed a promotion spud on the top-level home page.
Tip You can promote your current day's or week's events on-site by customizing promotion spuds to create effective digital signage displays. Learn more.
Notice that you have the Date Finder, Day Summary, and Event Slider spuds on your default calendar.
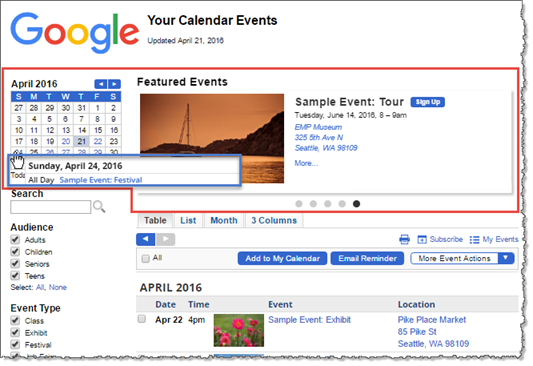
Preview window showing the DateFinder and Event Slider spuds outlined in red, and the Day Summary spud outlined in blue.
Note that field Spud will appear on the same page as the main calendar spud isn't selected on your default promotion spuds, as highlighted in red in the screenshot below.
When you don't set this field, your spud code includes the teaserBase property, as shown highlighted in blue in the screenshot below. The teaserBase property delivers the URL to which visitors are directed when they click an event, title, or footer link in a promotion spud. For more information, go to Spud Properties.
Try toggling the field on and off again to see this change in the code.
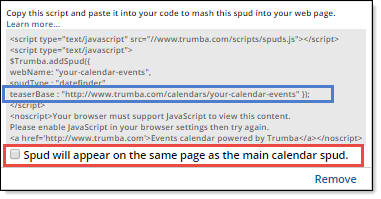
Spud code for the Date Finder spud, with the teaserbase line highlighted in blue.
To do so, you replace the URL in the teaserBase property for each promotion (e.g., in the spud code snippet that you've embedded on your website) with the URL for your own calendar page.
The most efficient way to do this is to:
Now, each time you create a promotion spud, the calendar address URL automatically replaces the default value in the teaserBase property.
Note For the Event Slider spud on your default hosted calendar, notice that in Publish Settings, the Featured event field is set to Featured events. For more information, go to Feature Events for Higher Visibility and Customize the Event Slider.
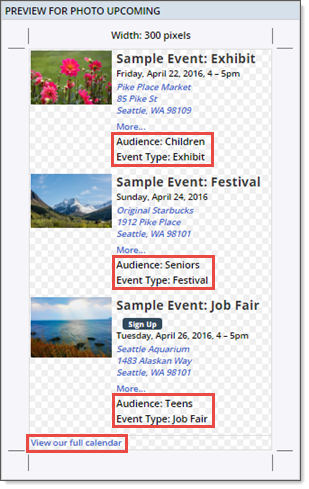
Previewing the Photo Upcoming spud.
Notice how the custom Audience and Event Type fields and the footer link label we updated appear in the spud preview.
Tip To preview all of the calendar, control, and promotion spuds you've created and customized, click the Publish Settings tab, and then click Preview all Spuds.
Everything you need to integrate the main calendar (and other spuds) into your website is available in the Publishing Control Panel.
Each spud is accompanied by some code enclosed in a <script> tag. You copy and paste that code (including the tags) into pages on your site to embed the spuds there.
For example, this is the main calendar spud code associated with the default hosted calendar generated when we ran the Trumba Startup Wizard for these Get Started articles:
The blue elements indicate the unique web name we applied in the wizard (your-calendar-events) and the spud type (main).
Interested in more detail about spud code? See Customize spud code.
Integrate spuds into your website
In the procedure below, we'll step through the process of integrating the main calendar and Filter control spud into a simple HTML page.
Tip To test integrating a spud into a website, you must be able to create and preview HTML pages.
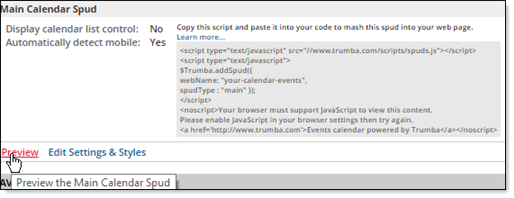
The code for the main calendar spud is displayed in a gray box in the Main Calendar Spud section.
<body> portion of an HTML page.The calendar displays in Classic Table view, the default view generated by the wizard.
<body> portion of the HTML page under the main calendar code.Tip When you view the page in a browser, you'll notice that placing the spuds inside a table will display them at more appropriate widths and in better positions in relation to one another.
For the purposes of the following procedure, create a test HTML page for the calendar and control spuds, called calendarpage.html, and one for the promotion spuds, called promopage.html. To try it:
At this point, you might want to contain the spud code in a table so that the main calendar and other spuds look better on the page.
For example, our code for calendarpage.html looks like the following:
Now, if you've added Photo Upcoming (see the section above called: "How do promotion spuds work on your hosted calendar?"), go to the Promotion Spuds tab.
In the Photo Upcoming box, copy the spud code, and then paste it into the promopage.html page.
Tip The promotion spud will look better if you enclose it in a table with an assigned width of 300 pixels or so.