With Trumba® Connect event registration, you can:
Watch this video to see how to set up registration events (either virtual or in person), send invitations, manage the list of attendees, and more.
Important Because event registration settings are complex, we strongly recommend that you test each event before it goes live. You can add events initially to a separate test calendar that uses the same settings as your live calendar, and then after confirming that things are working correctly, move the events from the test to the live calendar.
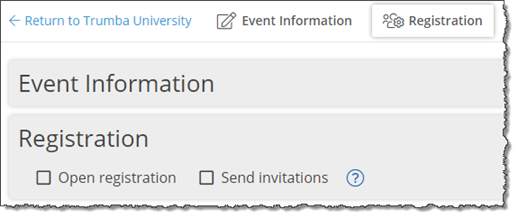
To set up event registration:
or
If you're creating a new event, click Add Event above the calendar.
![]()
Open registration (see How to set up an open registration event) to allow anyone with access to your published calendar to register for the event.
and/or
Send invitations (see How to send invitations to register for an event) to invite specific people to register for the event.
You can both allow open registration and send invitations for the same event.
Important notes
(To also, or only, send invitations, go to How to send invitations to register for an event.)
Note Alternatively, you can keep an event private by only sending links and invitations to specific people to register for events that are on private and non-published calendars. For more information, contact Support.
If you created a custom registration form, you can select it here. If you apply the same custom form to most of your events, you can set that form as the calendar's default in calendar settings. See To rename and set up the default calendar.
Important By default, in some calendar views, a Sign Up button appears next to open registration events on your published calendar. Site visitors can click the Sign Up button to register for the event. See Notes about open registration buttons in this topic.
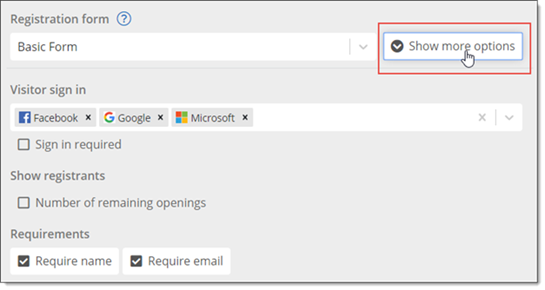
(Available if a publisher with admin privileges has set up visitor accounts for your organization. See Visitor accounts: an overview.)
Tips
Note Both Require name and Require email are selected by default, and both are always required for paid registration events.
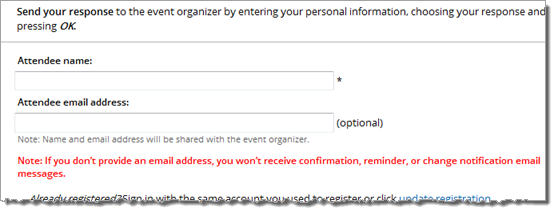
With the Require name check box cleared, the word (optional) appears to the right of the Attendee name field in the registration form.
With the Require email check box cleared, the word (optional) appears to the right of the Attendee email address field in the registration form.
If the event has a registration limit and a waiting list, after the event fills an email address is always required (so that registrants can be added to the waiting list).
When the email address is optional, and registrants don't provide one, the registrants don't receive a registration confirmation or reminder emails.
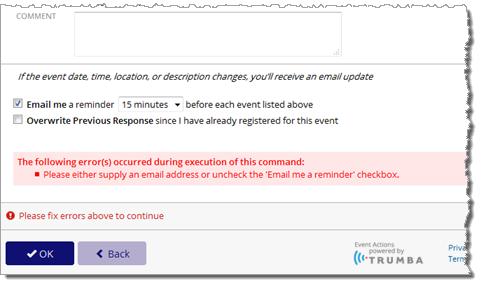
In this case, the following warning (in red) appears:
Tip You can change the default labels for the name and email fields, and for the "no email provided" warning text. In Publish Settings, on the Publish Settings tab, click Edit EA Settings. In the Registration Messaging section, update the Attendee name label, Attendee email label, and/or Email optional message text, as suitable.
Registrants who don't provide an email address but still request an email reminder see the following warning (in red) after they click OK:
Note If you set up scheduled reminders for an event, people registering for the event won't see the Email me a reminder control on the registration form. (To set up scheduled reminders, see step 12.)
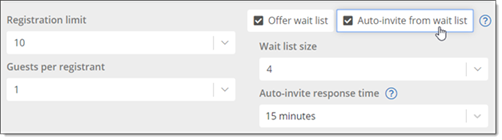
For Guests per registrant, set the maximum number of guests each registrant can bring with them to the event. (Guests of the registrant don't have to register separately.)
Important When you set a registration limit, make sure to factor in both registrants and their guests. That is, if the registration limit is 10, and five people register and each brings a guest, the event is full.
If you set Guests per registrant to anything other than None, the Number attending (including yourself): field appears on the registration form, reflecting the number of guests allowed.
In this example, Guests per registrant was set to 3, so the Number attending (including yourself): field on the registration form allows up to 4 (for the number of guests allowed plus the registrant):
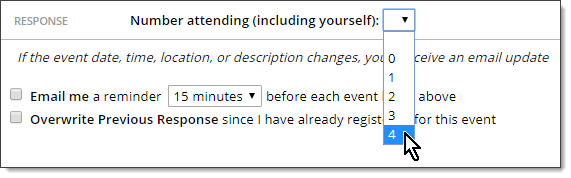
Note The Number attending (including yourself) field on the registration form is blank by default, which forces the registrant to specify the number attending. This increases the chance that the correct number of registrants + guests is submitted, rather than allowing registrants to just click through a default of 1 (when they are also bringing guests), which would then report an incorrect number of total attendees to the event organizers.
When you select Offer wait list:
When you select Auto-invite from wait list the Auto-invite response time control appears, which specifies how long to wait to send an invitation to the next person on the wait after the previously invited person hasn't responded (registered or declined).
This process continues sending invites, in order, to the people on the wait list, until all the available space(s) are filled, or everyone on the wait list has been invited. It's first come, first serve amongst all the people invited, whoever responds first. This is a great option to use to help fill all of the available spaces for your events.
If you leave Auto-invite response time set to the default Unlimited value, the spaces remain reserved for those invited. (In this case, invitees can never lose their reserved space since they have an unlimited amount of time to respond.)
In the screenshot below, for example, the event has:
The default, When event is published, means that people can begin registering as soon as the event appears live on the calendar.
To set a future date/time for registration to start, select Specify date & time, and then use the date and time pickers to specify the date and time. (The event still appears on the live calendar, however people can't register until the specified date and time.)
Note The Registration starts setting applies both to people you invite and people who sign up through open registration.
For more information about how Registration starts works with repeating events, all-day events, and event time zones, see Set a registration start date and time.
The default, Start of event, means that people can register up until the start time of the event.
To set a specific date/time for registration to end, select Specify date & time, and then use the date and time pickers to specify the date and time.
Tip For open registration events, after the Registration ends date/time has passed, Sign Up buttons disappear from your calendar, but, Wait List, Event Is Full, and Closed buttons still appear. See Notes about open registration buttons in this topic.
How does Registration ends work with repeating events?
Can I as the event organizer register someone after the Registration ends date/time has passed?
(See also: Set up check in for an event.)
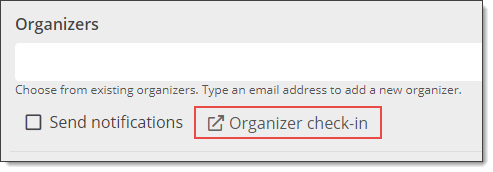
To add organizers to the event:
Note By default, (the email address of) the current Publisher account appears as an organizer for the event. You can remove this organizer and add in your own organizer(s), as appropriate.
or
Type email addresses for new organizers in the field directly, and then click Enter.
To set up organizers to receive notification emails:
Emails are auto-generated to the organizer(s) when:
To check in registrants at the event, organizers:
To do so, organizers:
or
Access the Organizer check-in link on the add/edit event form directly:
To do so, organizers:
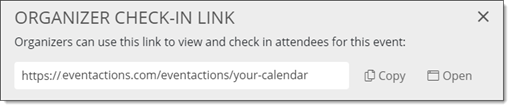
Click Copy to copy the link so that they can then paste it into a browser.
or
Click Open to open the link directly.
or
Alternatively, organizers sign into My Events directly, and then go to the Event Attendees page by clicking the Attendees button on events for which they're assigned as organizers.
or
They may also be able to sign in using their Trumba or Single sign-on accounts.
Important:
To create a custom registration confirmation message, select Custom confirmation text. A text form appears where you can enter the message text.
You can use the HTML editor buttons (highlighted in the example below) to add links, text formatting, images, and more (for more information, see HTML editor).
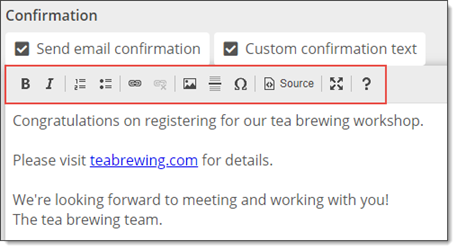
The message appears in the success page that registrants see after they register and in the registration confirmation email messages, if you decide to send them.
Alternatively, you can send custom messages to specific registered attendees, invitees, wait list people, etc. (that is, anyone who appears on the Attendees tab). See Manage event registration responses.
Note Reminders and invitations are independent from scheduled calendar email that you may have already have set up. See also: How to set up an open registration event, in this topic.
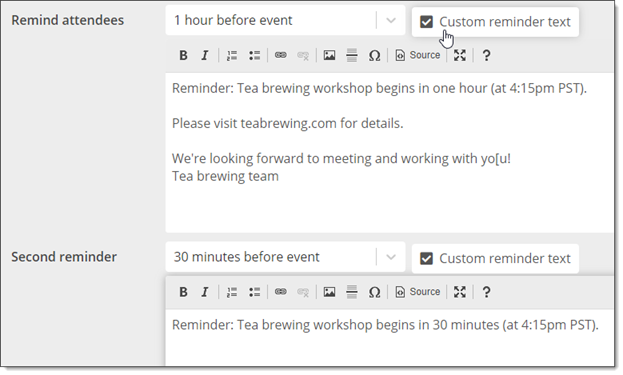
For Remind attendees, set the time before the event that you want to send the first reminder. Select Send immediately, to send the reminder immediately.
If the first reminder is far enough ahead of the event start time, the Second reminder control appears, where you can set a second reminder (closer to the start of the event) for registered attendees.
In either case, you can click custom reminder text to specify the reminder message, and use the HTML editor to modify the display (see HTML editor).
Important notes
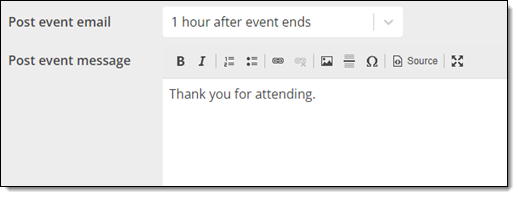
When a Post event email is enabled, you are required to enter a Post event message, which is included in the email along with the event details.
Sign Up and Wait List (if enabled) buttons show up by default. You can also display the Event Is Full and/or Sign Up Closed buttons if you want.
You can change the text for the registration buttons. You can also replace the default images with your own button images, as appropriate.
See: Event detail view.
However, if an event is full (and you enabled the Event Is Full button) or has a wait list, Event Is Full and Wait List buttons are still visible. Clicking Event Is Full does nothing. Clicking Wait List results in a message that the response deadline has passed.
Tip If you sometimes close registration several days in advance of an event, you can let registrants know that the registration deadline has passed by enabling the Sign Up Closed button. The button is visible in the time period between the response deadline and the date and time the event occurs.
You can either invite specific people to register for an event, or both send invitations and allow open registration. See also How to set up an open registration event.
To send invitations:
Tip For non-registration events, those that are neither open for registration nor have invitations, you can send event announcements. See Event announcements and reminders.
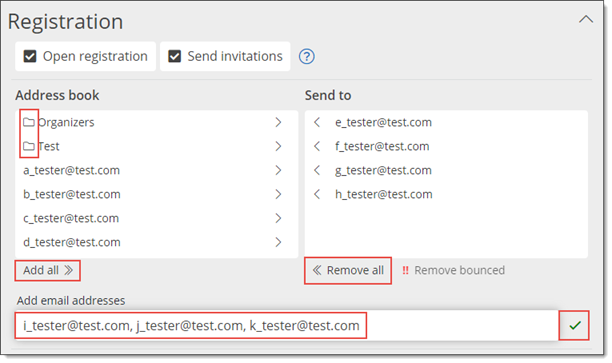
Notice the folder icons in the Address book selection list that indicates groups.
To add individuals and groups to the Send to list for the event:
and/or
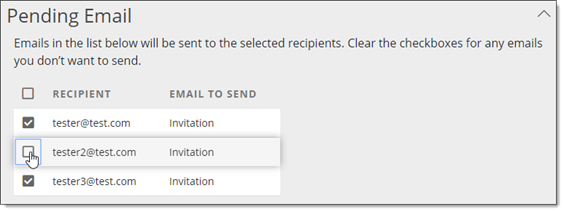
Note When you add invitees, they appear on the Pending Email tab, which appears after you click OK to save the event. Leave check boxes selected for every email address to which you want to send an invitation.
After you click OK, the invitations that you specified are sent, and the invitees appear on the Attendees tab. See Manage event registration responses.
To remove individuals and groups from the Send to list for the event:
and/or
Important You can invite more people at any time by adding new email addresses to the Send to list. When you click OK, you're again asked to confirm on the Pending Email tab if you would like invitations to be sent to the new people you've added.
Tips about using groups -- for more information, go to Your Address Book:
Note Email addresses and groups can't be shared between Trumba accounts. Each Trumba account maintains its own Address Book and groups.
Note Invitation emails provide a link to the registration form you've set up. See About custom registration forms.
Note After you set up the invitations, the steps are the same as steps 3-13 in the procedure above for setting up an open registration event.
By default, when you set up open registration for an event, the Add to My Calendar link will not display in event detail view footers or in calendar views where the sign-up links appear along with events in the calendar. See: Event detail view.
Example of an event detail view footer with Sign Up link showing and Add to My Calendar link hidden:
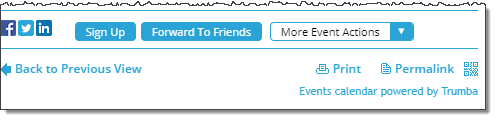
This makes it less likely that people will add the event to their calendars and show up to the event without having registered.
If you prefer, you can display the Add to My Calendar link along with the Sign Up link in the event details footer. See Social media and event actions in the footer.