If your Trumba representative has enabled your Trumba® Connect account for event submission forms, you can add a form to any calendar you publish. You can also set up your event approval process and customize the form. If you want to change something later, you can go back and edit the form whenever you want.
How do I get my account enabled for event submission forms?
Note The procedures in this topic assume that your account is enabled for submission forms, that you have already published your calendar, and that you have a website in which you've incorporated Trumba calendar spuds. Learn more about publishing and spuds.
You add and customize event submission form spuds in the Publishing Control Panel. Each published calendar can have only one submission form spud.
I could use an overview of event submission forms and the submission approval process.
Tip For help with submission form settings, click the blue buttons ( ).
).
Tip If you added a custom font to your publication, that font is applied to your event submission form.
I'd like to see an overview of the event submission process.
You can manage submitted events in two ways:
Recommended only when all event submitters are trusted colleagues who are familiar with the way your calendars and events are organized.
Note If the submission form is available to the general public, we strongly recommend that you approve submitted events before they go live.
These instructions assume you've already added an event submission form spud.
The Submitted sub-calendar is a temporary holding calendar for submitted events. The events remain on this sub-calendar until you approve and move them to a published calendar (or sub-calendar).
Tip If calendars you expect to see are not listed, it's probably because they're not sub-calendars of the published calendar. Only mixed-in sub-calendars show up here.
You can still add a submitted event to any of the mixed-in sub-calendars at the time you approve that event.
The following image shows the relationship between settings on the Edit Submission Form page and how Submitted sub-calendars work.
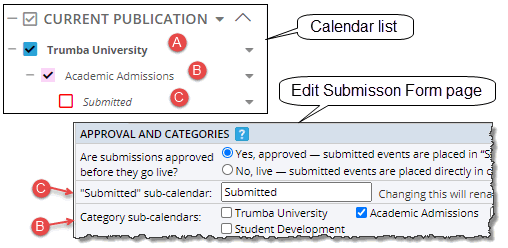
| A | Published calendar This is the calendar you publish. It may or may not include mixed-in sub-calendars. |
| B |
Category calendar Category calendars are mixed-in sub-calendars. When you select one or more of these sub-calendars on the Edit Submission Form page, two things happen:
|
| C | Submitted calendar This is the sub-calendar that Trumba Connect creates under the category calendar (if it exists) or the published calendar (if you don't use category calendars). Submitted events show up on this calendar. You promote submitted events to the parent calendar only after you approve them. |
You can make sign-in an optional or required part of the event submission process. You can also control which sign-in methods are available.
Tips
I'd like an overview of visitor accounts and the Event Actions web app.

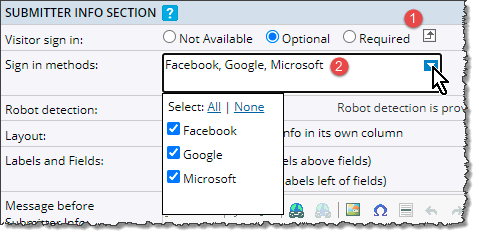
Settings for submission sign-in
Tip By default, the settings reflect the visitor account settings a publisher with administrative privileges set up for your organization. You can switch submission sign-in settings from optional to required and vice versa and limit the available sign-in methods. However, if visitor accounts are enabled for the account, you can't disable them for event submission.
Select Required to make sign-in mandatory before events can be submitted.
Tip If your organization enabled single sign-on for Trumba® accounts, you'll also see an organizational ID sign-in option in the drop-down list. Learn more about single sign-on.

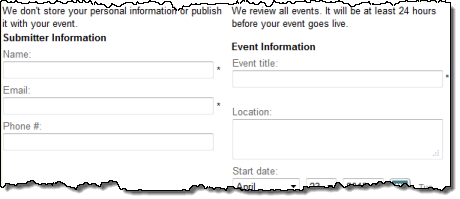
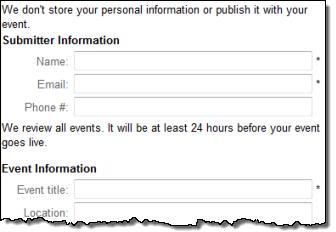
You can control the relationship of the form's Submitter Information and Event Information sections to one another. And you can control the width of the form by placing labels above or to the left of the text entry fields.
These instructions assume you already added an event submission form spud.

Settings for controlling submission form layout
Tip Even though layout settings are in the submitter info section, these settings apply to both the submitter and event info sections of the form.
Two-column form with vertical layout (labels above fields)
Submission form with horizontal layout (labels left of fields)
Tip This topic gives you an overview of how event templates and custom fields work in relation to your event submission form. For more details about the settings described here, follow the instructions for adding an event submission form and then click the blue Help buttons () on the Edit Submission Form page.
Your submission form has a default event template. It gets that template from the published calendar to which you added the submission form.
How do I find a calendar's default event template?
Why does a submission form's event template matter? Because the template determines the fields that the submission form contains. For example, if you want to let submitters submit images along with events, the template associated with the submission form must include an event image field.
Can I include fields in the submission form that do not appear in the published calendar?
In addition, if you have enabled more than one template on the published calendar, you can decide which template to associate with the submission form. You can even give event submitters a choice of templates by adding an event template field to the form.
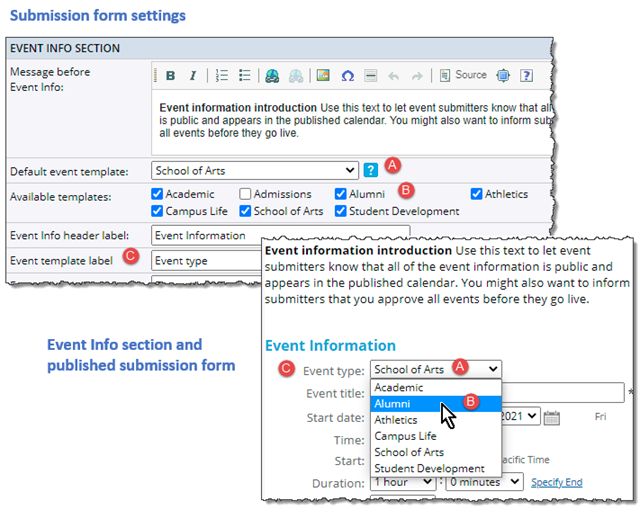
| A | Default event template Same as the default for the published calendar you added the submission form to. If more than one template is enabled for the published calendar (as shown here), you can switch the default. |
| B |
Available templates If you have enabled multiple templates for the published calendar, the templates are listed here. Selecting one or more adds an Event type field to the submission form and gives submitters the opportunity to decide which template they want to use.
Tip If you use only one template, ignore the check box you see here. |
| C | Event template field The event template field on this form is labelled Event type. |
In certain cases, you might want to add a field to the event information section of the submission form that does not appear in published events.
For example, you might want to add a hidden Request for Additional Services field to the submission form. This lets the person approving events know if an overhead projector, wheelchair access, or other special accommodations are needed. However, no Request for Additional Services field appears on the published calendar.
You add hidden fields by selecting them from the Display hidden fields list, such as in the image below:

Tip The hidden fields list includes all unpublished custom fields and fields set to not show on the submission form. The field you select shows up on the submission form only if it is enabled for the template(s) associated with the form.
You can set up a date start limit (the number of days into the future after which submitted events must begin) for calendar visitors submitting new events.
For example, if you set the date start limit to 30 days, visitors would not be able to submit any events that started earlier than 30 days from today's date.
You can also set up a date end limit (the number of days into the future that are available for submitting events). Leave the date end limit set to None if there's no limit how far into the future the event could occur.
For example here, with a date start limit of 30 days, and a date end limit of 45 days, calendar visitors would not be able to submit any events that started earlier than 30 days OR later than 45 days from today's date.
You set up event date limits by selecting the number of days in the Date start limit and Date end limit fields, such as in the image below:

Note The end date of an ongoing, multi-day, or repeating event must fall within the date limit you've set. For more information, go to What's the difference between repeating, multi-day, and ongoing events?
By default, when you create a new event submission form, an HTML editor is added to the Description and other multi-line text fields included in the published form.
Where can I learn more about the HTML editor?
The HTML editor makes it easy for event submitters with no knowledge of HTML code to add formatted text, images, and other content to fields in the events they submit.
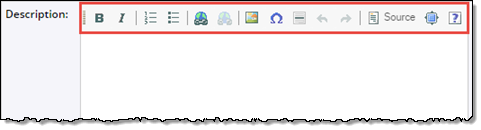
HTML editor in the Description field of a published submission form
Tip You can find the setting for showing or hiding the HTML editor on the Edit Submission Form Settings page in the Event Info Section under Options. To show the editor, select Enable HTML editor. To hide the editor, clear the check box.
Tip You can also customize the content of the confirmation email messages that event submitters receive. Learn more about customizing event submission emails.
You can add custom content to your event submission form in the following ways:
For example, you might want to let submitters know that personal information is never published. Rather, it serves as contact information in case you have questions about submissions.
For example, you might want let submitters know that all event information is public and that it appears in the published calendar. You might also want to inform them that you approve events before they go live.
If you leave this field blank, a default message appears: "We care about your privacy. Information provided via this form will not be resold or redistributed."
Any content you add to the privacy message field automatically replaces this default text.
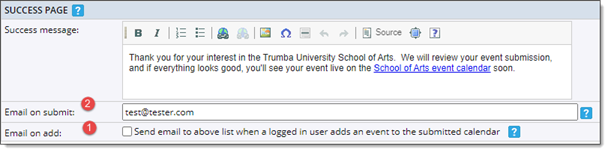
Submitters see a success page after they submit an event. You might want to add a message to this page that thanks submitters and gives them an estimate of when they can expect to see their events go live.
Each of the content fields includes the HTML editor that makes it easy for you to format text, insert images and lists, add hyperlinks, and more. You can also use the Source button on the HTML editor to add your own HTML source code.
The HTML editor makes it easy to add formatted text, hyperlinks, and even images to fields on the event submission form.
The following steps assume that you already added an event submission spud to the current publication.
What do the HTML editor buttons do?
Tip Even if you don't add a custom privacy statement, a default statement is added at the bottom of the submission form. ("We care about your privacy. Information provided via this form will not be resold or redistributed.")
You can sign up event editors to receive submission notification email messages when events have been submitted by the general public (or from a defined user community). The notification message looks something like this:
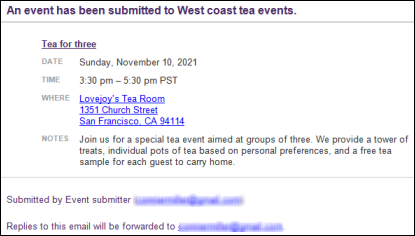
Designated calendar editors receive notification messages each time an event is submitted.
The notification message includes details about the submitted event and, by replying to the email, the editor can contact the submitter to clear up event questions or provide information about the event's approval status.
Before I decide who gets notified, I'd like to see an overview of the event submission process.
If you enter multiple email addresses, use a semicolon and a space to separate them.
If part of your internal workflow requires approval and review for events added to shared calendars by Trumba account holders, you can use submission forms to help manage that process.
When you create submission forms with submission approval enabled, submitted sub-calendars are added automatically to the published calendar with which the event submission form is associated.
Tip Notification emails are triggered only by added events the submitted sub-calendar actually owns. For example, if an editor adds an event to another calendar and also shows the event on the submitted sub-calendar, no emails will be sent.
Tip For specific details about the Email on add and Email on submit options, click the blue buttons next to the options on the Edit Submission Form Settings page.