Submit an event using the event submission form
What type of event submission information do you need?
- Tips for successful submissions
- Additional guidelines
- What if I'm submitting a repeating or multi-day event?
- What if I have to withdraw or cancel an event?
Tips for successful submissions
To make your event submission process as smooth as possible, pay attention to a few key tips.
- Read the instructions If the website you're submitting to provides instructions for event submissions, read the instructions carefully. Following the instructions makes it much more likely that your event will be posted in a timely manner.
- Fill out required fields Required fields have an asterisk (*) beside them. If you ignore required fields, you'll see an error message and will have to fill out the fields anyway.
- Don't worry about giving your name and email address This information is typically required (along with your phone number, in some cases). It isn't published on the calendar or used for anything besides contacting you if a question arises about your event.
- Don't be afraid to click Next After you fill out the information and click Next, you'll still have the opportunity to review the information. If something isn't right, you can click Back to fix it.
Tip If you do need to go back and fix something, use the Back button in the form not the browser's Back button.
- Confirmation email message After you submit an event, you will receive a confirmation email message. Keep that message. If something comes up and you have to withdraw or cancel the event, you can do it from that message. If you have to contact the calendar publisher, you can reply to the message.
- How will I know when my event is live? You can check the calendar for your event, or click My Events above the calendar (if available), and then go to My Submissions to check if the event is pending or approved.
Additional guidelines
Event category
If you're asked to select the category your event fits into, it's a good idea to select the category before you fill out any other fields. Sometimes the form's fields change depending on the category you choose.
If the website provides information about the category field, be sure to read it before you choose.
Location
For location, provide as much information as you can. If possible, provide enough information so that the location can be mapped. For example, in addition to a venue name and a street address, provide a zip code.
In some cases, you might see a type-to-search or drop-down-list location field.
These field types are common in large organizations where most events occur in specific venues on the organization's campus.
- In a type-to-search field, begin typing a location name, and a list of matching locations pops up. Select the correct location.
- In a drop-down-list field, click the small down arrow on the right, and then select the location from the list.
Date and time options
When calendar publishers set up submission forms, they make decisions about what date and time options to offer. On your form, you may not see all of the options described here.
I'm submitting a repeating or multi-day event.
Start date and time
Select a start date and time for the event. Unless the event lasts more than one day, the start date is also the end date.
Time
If the event lasts all day, select All Day. Otherwise, select the time that the event begins.
Duration
When you create an event, you have two options for setting its length. You can specify:
- How long the event will last (this is the typically the default).
When Specify duration is checked, choose hours and minutes.
- When the event starts and ends.
When Specify duration is unchecked, choose the End time.
For most events, duration is best but, if you're creating an event that lasts more than one day, you may want to specify start and end dates and times.
Tip To create an open-ended event with no specific end time, uncheck Specify duration, then set the end time to match the start time.
Web link
Use this field to provide a link to a website that contains additional information about your event. Be sure to type the full URL including the http. For example, type https://www.trumba.com instead of trumba.com.
The link appears in event details that open when calendar visitors click the event title.
Description
The Description field is your opportunity to provide additional information about your event. This event description appears either on the website calendar itself or in the event details that calendar visitors see when they click the event title.
While it's important to provide the key event information visitors need, it's also important to present that information as concisely as possible.
Tip On some forms, you might see an HTML toolbar at the top of the Description field. Use buttons on the toolbar to add formatting to the event description. For example, you can make words bold, add a horizontal line, or include a numbered or bulleted list.
What if I'm submitting a repeating or multi-day event?
The calendar publisher determines what types of repeating and multi-day event options are available on the submission form. On your form, you may not see all of the options described here.
If you're setting up an event that repeats regularly, follow these basic steps:
- For Repeat, select the frequency (for example, Weekly).
- For every, select the unit (for example, Other Week).
- For on, select the day(s).
- For through, select the end date.
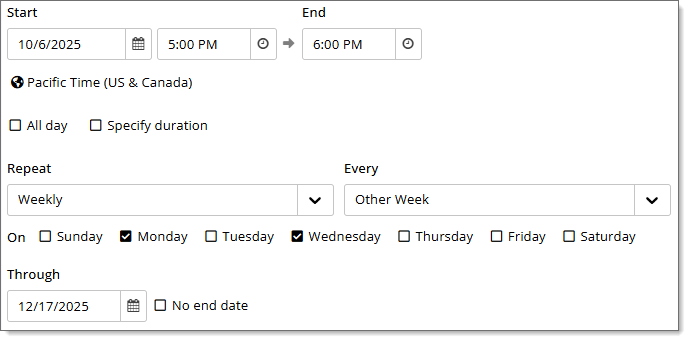
Tip If you pick a repeating pattern (such as the 5th Friday) that not all months have, the calendar automatically places the event on the most appropriate day (for example, the 4th Friday).
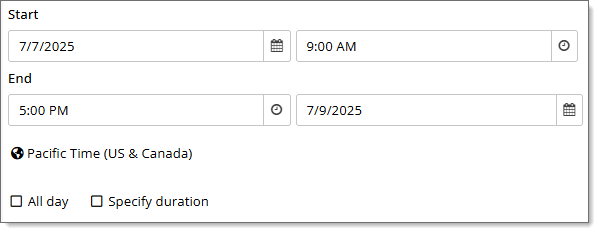
If you're setting up a multi-day event:
- If checked, uncheck Specify duration.
- Enter the start date and time, then the end time and date.
What if I have to withdraw or cancel an event?
When you submit an event, you receive a confirmation email message that looks something like this:
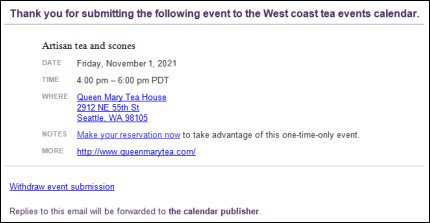
It's a good idea to hang onto that email message for a while. If the event you submitted gets cancelled, you realize the submission contained an error, or you just decide not to list the event on the site, you can click the Withdraw event submission link in the message to withdraw or cancel the event.
After you click the withdraw link, you see the Submitted Event Detail page that shows the status of the event, a link to view the event (if approved), and the option to withdraw or cancel the event.
Note Cancelling the event labels the event as cancelled on the live calendar.