Calendar-level registration reports
When you invite people to an event or let them sign up from your published calendar, you have two options for tracking and managing registration information. You can display and export a registration report for:
This topic covers the second option, calendar-level registration reports.
Can I extract registration data using an automated feed?
Why generate calendar-level registration data
While you rely on event-level registration data to manage day-to-day tasks related to offering events, calendar-level registration data gives you an overall picture of how event registration is working.
For example, using calendar-level data, you can analyze registration patterns for a month or year to see which events or event times are most popular, if your events are reaching the right audiences, and more.
How to generate and export a calendar-level registration report
- On the top of your page in your Trumba editing environment, click Reports.
- Under Registration, click Registration Report.
- On the Registration Report page, in the Calendar field, select the name of the calendar you want to report on.
- Event Start Date is the date of the earliest event you want to report on. By default, it's today's date.
Click the calendar control to select a date in the future.
If you want the report to include events scheduled before today's date, type a past date in the Event Start Date text field.
Tip To generate a report for all events scheduled on one day, use the same date in both the Event Start Date and Event End Date fields.
- Event End Date is the date for the most future event that you want to report on.
Click the calendar control to select an end date.
If you want to use an end date in the past, type the date in the Event End Date text field.
Tip If you leave Event End Date blank, the end date for the report is the date of the most future event for which someone has registered.
- Email Address is the email address of a specific attendee that you want to report on.
To return all attendees, leave this field blank.
- Include Uninvited allows you to include or exclude anyone who was uninvited to an event.
- Click Run Report.
A report that looks similar to the following image (your report most likely includes other fields) shows up immediately just below the report options.
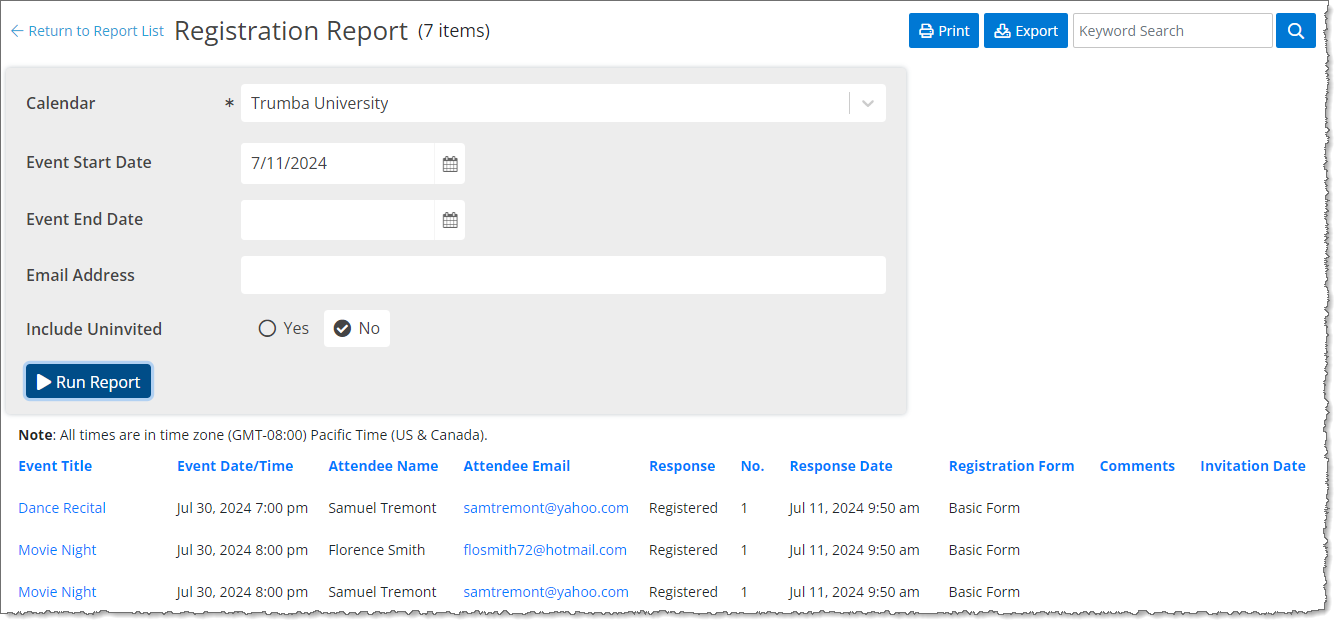
Calendar-level registration report
Tips
- Columns in the report match fields from the basic or custom event registration forms associated with events the report covers. If events use a mixture of forms, each field from each form is represented by a column in the report. By default, the report includes a sortable Registration Form column.
- If you set one or more custom fields to show in registration reports and feeds, columns for those fields appear in the report between the Event Date/Time and Attendee Name columns.
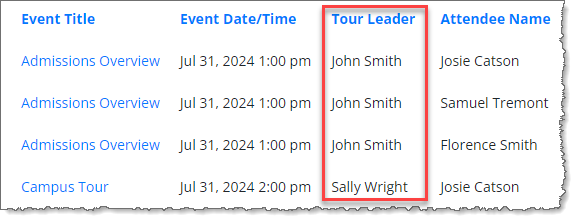
Custom field columns, registration report
How do I set custom fields to show in registration reports and feeds?
- If one or more events required paid registration, the report includes additional columns between the No. and Response Date columns:
- Amount, which lists the amount each registrant paid.
- Price Label, which lists the label assigned to each pricing option, if the event offered multiple pricing options.
- Discount Code, which shows the discount code used (both the code and amount of discount).
I'd like more information about paid registration.
How do I set up multiple pricing options?
- To sort the data, click one of the column headings.

Clicking a column heading sorts the data.
- Review the report to make sure it covers the events you expected. If you want to modify the report dates or even switch to another calendar, change settings, and then click Run Report to generate a new report.
Note The Registration Report will only return records for events where the user has Edit rights on the owning calendar.
- Click Print to print the report.
- Click Export to save the report as a comma-delimited file (.csv) that you can open in a spreadsheet. By default, the report name is Registration Report.csv.
- Use the Search field to search the report.