You can brand your Trumba® hosted calendar page by adding an image to the header section.

For help with the Add an Image options, click the blue Help buttons. Or, see Add images to events and Manage your image collection for more information.
Tip To help visitors to your hosted page find your website, add a link in the hosted calendar's header. From the Publishing Control Panel, click the Publish Settings tab, and then click Edit Publish Settings. In the Publish Settings section, in the Description field, type the URL. Click OK. URLs in the description field are automatically hyperlinked.
The maximum size for images on hosted calendars is 180 pixels wide by 120 pixels tall. If an image is larger than that, it gets resized to fit those dimensions, regardless of its original proportions. This means that some images look squished or misshapen.
To solve the problem, either:
For example, if your original image is 320x320 pixels, add an outline or background that increasess the width to 480 pixels.
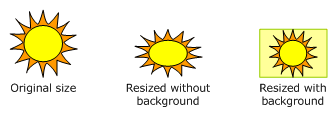
Use a background to adjust an image's dimensions so it resizes proportionally.