When you publish a Trumba® calendar, the default and alternate views that you choose for the main calendar determine the way the event information appears. Within some views, you can refine the display settings by selecting which event fields to display in or remove from the main view. You can also specify the order in which the fields appear. For example, you can display a web link in the main calendar view or display only one line of the description to keep the main view uncluttered.
The views you choose for your main calendar determine which fields you can display, remove, rearrange, or edit the label for. Only the list-based views support rearranging of fields, and within those views are varying degrees of customization. For example, you can change the label for the Location field within the Classic Table view but not in the Classic Week view.
| View | Fields you can modify in this view |
|---|---|
| Classic Table | Start date, Start time, End date, End time, Title, Location, Description, Web link, Duration |
| Classic Week | Description, Web link, Duration (can also display or hide Location) |
| List | Location, Description, Web link, Duration |
| Performance Schedule | Location, Description, Web link, Duration |
| Compact List | Location, Description, Web link, Duration (can display, remove, or rearrange, but not change labels) |
Tip All views allow you to display, remove, and rearrange pre-defined or custom fields that are included in the event template you use for your published events. Tell me more about custom fields and event templates.
You set the way fields are displayed in the Publishing Control Panel. Before you do that, though, you need to select the appropriate calendar view and event template.
In the Publishing Control Panel, you can set the way fields are displayed for the default view you chose, as well as additional views you want to include with the calendar.

Do any of the following:
This list does not appear if all fields are displayed.
For example, you might want to limit the number of characters in the Description field to keep the main calendar view uncluttered. The text is truncated, showing an ellipsis (…) to indicate to calendar visitors that there's more. They can click the event to see the complete information on the event details page.
Note If you add a field to the published calendar view, but you didn't populate the field in the add/edit event form when you created the events, the field might not appear on the calendar. Again, the exact behavior depends on the field and the template design. When in doubt, check the preview for the view you're customizing.
Note To enable visitors to select the view they want, you embed a view chooser spud, shown below, on the same page as your main calendar.
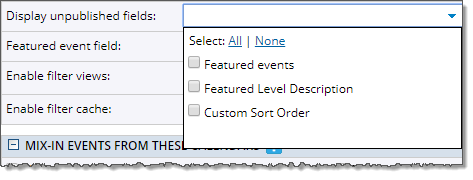
On the Edit Publish Settings page for the selected publication, you can choose to display unpublished (or, "hidden") fields (those that are *not* set to Allow this field to be published on the Edit Custom Field page -- see Create Custom Event Fields). In this way, you can override the field setting, and include the unpublished/hidden field with your publication.
A drop-down list appears displaying the unpublished/hidden fields that are currently *not* set to Allow this field to be published on the Edit Custom Field page.