If you offer Event Actions on your published Trumba® Connect calendars, visitors to the calendars can stay connected with events by taking a variety of actions.
For example, visitors can add events to their personal calendars, forward event information to friends, set up event email and text message reminders, and more.
I need a more detailed overview of what event actions are.
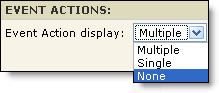
You have control over how many events visitor can take action on at a time and which actions are available in event detail views.
For most calendar views, the default setting lets visitors perform an event action on multiple events at a time.
For example, a visitor can select three events and then click Add to My Calendar to add all three events simultaneously.
You can switch the event actions setting so that visitors can take action with only one event at a time. Or, you can turn off event actions altogether.
I'd like more detail about how selecting multiple versus single affects the published calendar views.
Tip The multiple-versus-single event actions setting is not available for the following views: Linear Grid, List by Month, Maps, News, and Photo Events. In these views, visitors can still take actions on events by clicking event action links in the calendar events themselves or in the event detail views.
Or, select Add a Calendar View to add a new view to the control panel.
When this option is selected, an event actions icon is added to each event.
If most of your events occur only once and you expect the typical visitor to be interested in more than one event, it makes sense to let visitors take actions on multiple events.
When you enable actions on multiple events, an Event Actions panel is available at the top of the calendar view.
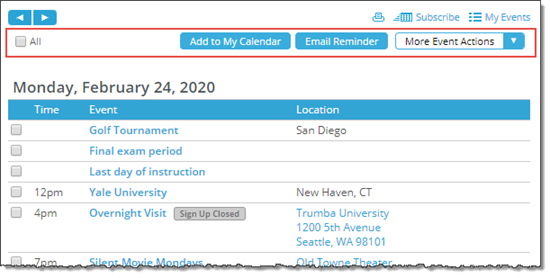
Event actions panel (outlined in red). Your panel may look a little different from this.
To take action on multiple events, visitors select check boxes to the left of the events that interest them. Then, in the Event Actions panel, they click an action button or select an action from the More Event Actions list.
If many events on your calendar occur at more than one time (for example, you offer the same workshop, seminar, or performance a number of different times), it probably makes the most sense to let visitors act only on single events.
This published calendar shows how Event Action options look when visitors can select only one event at a time.
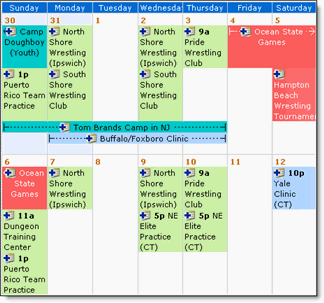
To add an event to a personal calendar or take other event actions, visitors click the event action icon ( ) next to the event.
Every event has an event detail view. You can control whether or not the core event actions (such as Add to My Calendar and Forward to Friends) show up in the detail view. And, you have the option of showing additional actions, such as posting to Facebook and Twitter.
For example, in the following event detail, visitors have access to the core event actions, and they can post the event information to Facebook or Twitter, copy a permanent URL to the event details page, and download a QR code image file.
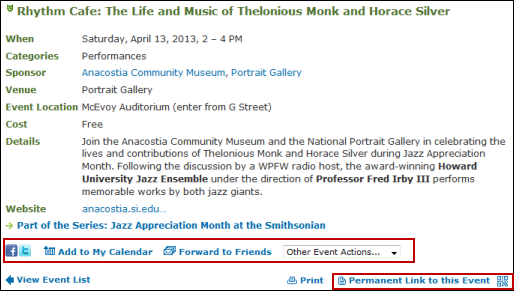
Event detail view with core and optional event actions outlined in red.
To learn more about controlling the event detail view action display, see Event detail views.