If you host events that attendees must register and pay for, you need to include a way for attendees to submit payment.
This topic assumes that you've enabled your account for paid registration and set up a payment gateway. See Introduction to paid registration.
Tip Because paid event registration settings are complex, it's essential that you thoroughly test each event before it goes live. The best approach is to add events initially to a separate test calendar that uses the same settings as your live calendar. Once you confirm that things are working correctly, you can move the events from the test to the live calendar.
Event registration can be set up with different pricing options and discount codes. When registering, only one pricing option and/or discount code can be used and will be applied to all attendees under the registration.
Note For a paid event, all registrants and their registered guests pay the same price.
Important US dollars is the only currency currently supported with Trumba paid registration.
Related resources:
To start, in the Trumba editing environment, add an event (or edit an existing event) that you want attendees to register and pay for.
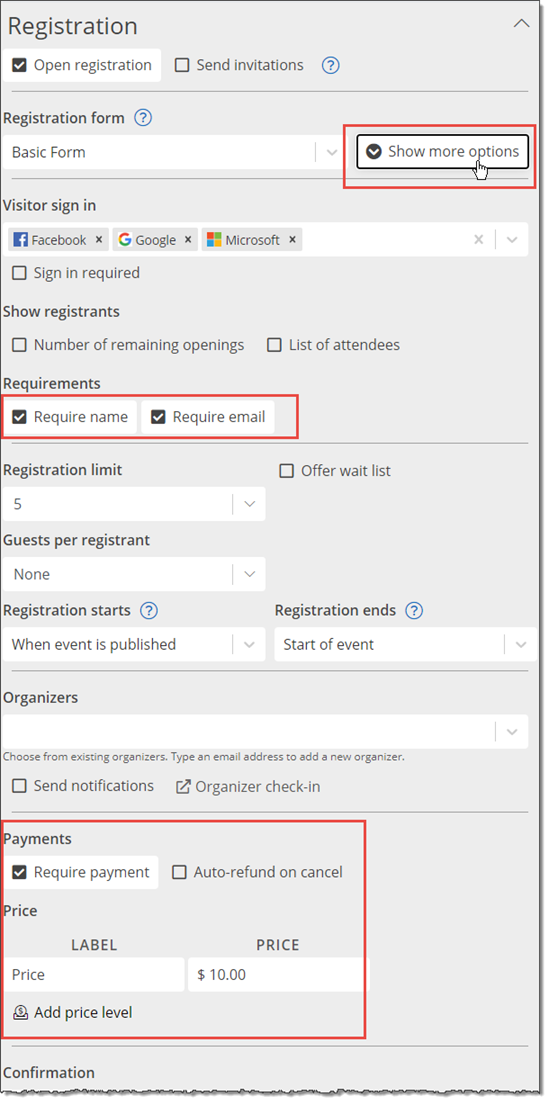
Then, on the Registration tab, do the following:
and/or
If your event is by invitation, select Send invitations.
Note Open sign-up events include a sign-up button or link that visitors click to start the registration process.
How do I create a custom registration form that contains my own questions?
Tips
There are two ways to add variable pricing for paid events: price levels and discount codes.
Price levels are used when you want all pricing options visible. You can set up as many price levels as you need for an event, and limit the number of registrants by price level if required. All price levels appear when an attendee registers for an event.
Discount codes allow you to give select attendees a code to receive a lower price for an event. The discount code field will show only if a discount code has been added for an event.
Both price levels and discount codes are event specific and can be used separately or together. If a discount code is used, it will apply to all price levels.
Note If you want to quickly see which events have price levels and/or discount codes, use the Registration view on the Events page.
You can set one or more price levels for a paid event.
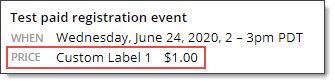
If you change the default label (Price), the custom label appears on the registration form, such as in this example:
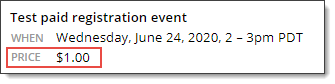
If you don't change the default label (Price), it doesn't appear on the registration form, such as in this example:
or
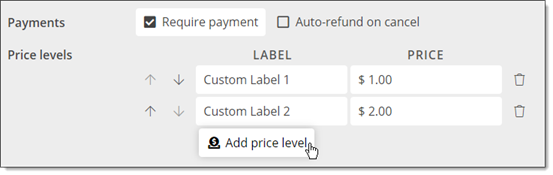
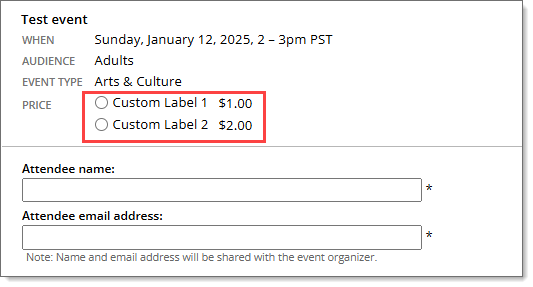
If there are multiple pricing options for the event, you can add price levels:

Note If you have multiple pricing levels, all of the labels always appear on the registration form.
Note If you have registration limits on price levels, wait list functionality is disabled.
Tips
In addition to price levels, you can use discount codes to allow attendees to pay different amounts for an event.


Tips
If you want to let some attendees (for example, employees or students) register for an event without paying a fee, you can set up a free option using a price level or discount code.
Note Although these two options both result in a free registration, you can decide if you want all attendees to see the free option on the registration form (using different price levels), or if you want only one price displayed on the registration form and giving appropriate attendees the discount code to allow them to register for free.
In addition, free registrants do not appear in the event's transaction reports.
Tip If you offer a free pricing option, registrants who select that option will be able to cancel their own registrations even if you don't allow self-serve refunds. How do refunds work with paid registration?
If you have set up your registration to allow a number of guests, all people on the registration will pay the same price.
For example: Say you have an event that allows four guests, the price of the event is $20, and there is a 20% off discount code.
If you want to have only one person pay for the registration and allow free unregistered guests, you can use custom registration questions to obtain the guest names and information.
Important Trumba does not track the number of unregistered guests for event capacity, organzier check-in, or event reporting.
The paid registration features work best with single-occurrence events. If your events recur multiple times (for example, a class or concert series), the best way to handle it is to do the following:
For example, for a class, set the start date on the first day, and the end date on the last day.
Registration forms
When you set up multiple pricing options for an event that registrants pay to attend, all registrants see the same options in the open registration or invitation form.
Here's an example of how multiple pricing options might look in an open registration form:
Here's an example of the registration limit for a price level being reached:

If you are using discount codes, here's an example of how the open registration form might look:

The attendee can enter the discount code and click Apply. If the discount code is valid, the discount amount and discount price will be displayed.

Note You can use multiple price levels and discount codes for an event. When using multiple price levels, the Discount Code field will appear after a price level has been selected.
Registration reports and feeds
When you set up multiple pricing options and discount codes, Price Label and Discount Code fields are added automatically to registration reports and feeds. This makes it easy to sort reports by pricing option and to distinguish between options that may have the same price.