With Trumba event registration, you can: create open registration events, where anyone with access to the published calendar can sign up; invitation-only events, where you send invitations to specific people to register for the event; or a combination of the two. See Set up event registration.
In this article, we'll practice how to set up open registration, choose registration options, track responses, and create a new custom registration form.
Tip You can print this article from your browser, or to work on-screen, you can open two browser windows, one with this article and the other with the Trumba editing environment.
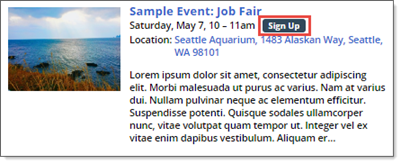
A few of the sample events generated by the Trumba Startup Wizard already include event registration, using a basic registration form. These events appear with a Sign up button (on the hosted calendar view).
You can review the basic form and registration steps by clicking Sign Up on one of the sample events, and then following the process.
For this article, however, we'll practice creating a new, custom registration form to ensure that the information you need is submitted with the event registration.
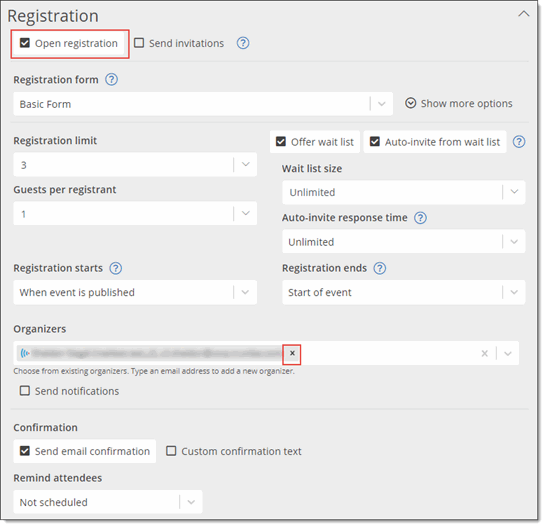
You can also set the maximum number of attendees (registrants plus guests), offer wait lists plus automatic invites, set up event organizers to check in registrants and guests at the event, require payment, send scheduled reminders and custom emails, and more. See: Set up event registration.
Set up open registration
You can set up registration at the time you create a new event or for any existing event. You can practice here:
The Trumba editing environment opens to your new calendar, selected under Current Publication on the left.
the add/edit event form appears, with the Event Information tab open, by default.
(If you're creating a new event, fill any required fields on the Event Information tab, and then continue with the next step.)
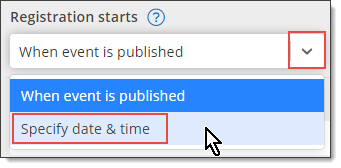
But, note that for each, you can click the drop down to the right of the field, click Specify date & time, and then follow the prompts to set different dates/times.
Test how the registration process works using the event you set up in the procedure above.
Register for the event
Now that you've set up open registration for an event, test how the registration process works.
For Number attending (including yourself), select 2.
Click OK.
Close the Event Registration Confirmation page.
This time, for Number attending (including yourself), however, select 1.
Click OK, and then close the Event Registration Confirmation page.
(Note that if you wait a bit before this step, the button refreshes to read Wait List rather than Sign Up.)
On the Event Registration page, notice that Add me to the wait list is selected, and that the message at the bottom reads: This event is now full and has a waiting list.

The event is full because we set the registration limit to 3. The first respondent indicated that 2 people would be attending, so after the second respondent signed up, the limit of 3 was met.
You don't need to make any further changes to the hosted calendar at this point, so you can close the browser if you want.
Tip You can also set up reminder emails for the event. See: Event Announcements and Reminders.
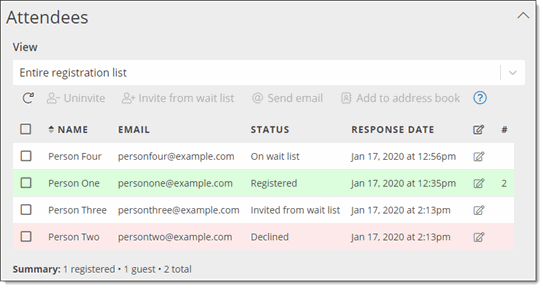
As people sign up for your event, you can track their registration responses on the Attendees tab for the event.
Track and manage registration responses
Registration responses appear in a table on the Attendees tab for the event. From the table, you can manage the response list and export it for analysis in a spreadsheet or database program.
Here you'll see a table that lists the names, responses, and other information about each person who has registered or added themselves to the wait list.
Based on the steps you took in the section above, Test the registration process, the table should look similar to the following:
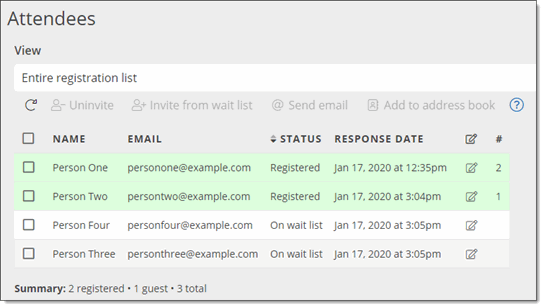
Notice that the first respondent, "Person One," shows two attendees because they included a guest. You can see this in the status bar: "2 Registered, 2 Wait List, 3 Total Attending."
 ) to the right of the second respondent (we used "Person Two").
When you decline on behalf of respondent two, only two attendees are now registered (both for "Person One"), and a spot opens up within the registration limit of 3 for the event.
Because you selected Auto-invite from wait list in the section above, Set up open registration for an event, the first respondent to have joined the wait list ("Person Three") is automatically invited.
You'll see that Person Three now has the status, "Invited from wait list":
Tip To help with locating a registrant, you can sort the list by clicking a column heading.
) to the right of a respondent. Change a response or the number attending, or add a comment, and then click OK.
Important If you uninvite a person who is registered or invited from the wait list, a spot opens up within the registration limit of 3 for the event. And, since you selected Auto-invite from wait list in the section above, Set up open registration for an event, the next person on the wait list ("Person Four" in this case) is automatically invited.
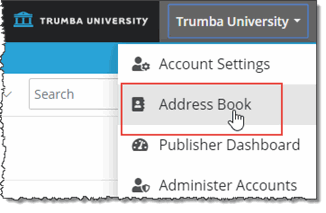
To check that the respondents now appear in your address book, click your account name in the upper-right corner, and then click Address Book in the drop-down menu, such as shown here:
Important: The examples above cover how to set up event registration using the Auto-invite from wait list option. (See Set up registration for events.) Alternatively, you can manage the responses manually, by selecting who to invite from the wait list yourself.
Or, you can set up your event to both automatically invite people on the wait list, plus automatically invite the next person if the previous invitee hasn't responded within a set time limit. This is the best option to use to help make sure you fill all of the available spaces for your event. Learn more.
If you completed the earlier tasks in this article, you have a pretty good idea about how to set up event registration and manage responses.
In this section, you'll learn how you can customize event registration forms so you collect exactly the information you need. For example, you can require respondents to provide an ID number or gather information about their past experience.
You can also add instructions to your registration form and divide it into sections so it's easier for registrants to navigate.
Customizing registration forms includes:
Tip In these procedures, we use the example of an organization offering a tour. You can always substitute your own situation if it makes more sense.
Create custom registration questions
When you create custom registration questions, you choose a field type for the question and, when it makes sense, provide a default value for the answer.
Tip Setting commonly used default values can save site visitors time when registering. For more information, go to Set default values and other requirements for fields.
This question name assumes you're creating a custom registration form for a tour. If you'd rather use a different question name, go ahead. The name will appear as a column heading in the table where you manage registration responses.
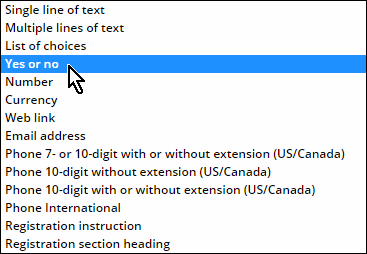
Notice the long list of question types from which you can choose.
Add instructions
You can add context to your registration questions by including instructions on your registration form.
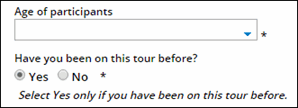
An instruction follows the first question in this portion of a registration form.
This name is for internal use only and won't be seen by site visitors.
This is the instructional text that people registering for the event will see.
Tip If your registration form contains a lot of information, you can divide it into sections using section headings. You add section headings to forms exactly the same way you add instructions except, in step 5 above, you select Registration section heading.
Create a new registration form and add your custom questions
Now that you've created some custom registration questions and instructions, it's time to create a form to contain them. Custom forms you create automatically contain all of the default registration fields, such as name, email address, and response, in addition to the custom fields you add.
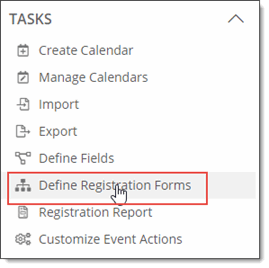
If you don't see the Define Registration Forms form, under Tasks, click Define Registration Forms.
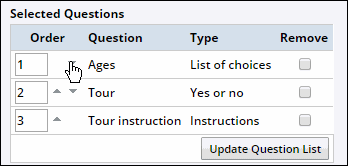
Click the small up or down arrow next to Age to move it directly under the Tour instruction field. This guarantees that, on the form, the instruction will appear underneath the question to which it applies.
Apply custom registration forms to events
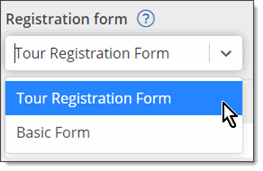
Now that you've created a custom registration form, you can add it to an event by opening the Registration tab where you initially set up the event registration options.
The table also contains a column called Actions. Click a link in the Actions column to edit, remove, or take other actions with a specific response.